
Hi everyone! So as usual Sunday saw the unveiling of
another great word over at Bird is the Word Challenge Blog
- this time the word for the next month is DISCOVER.
Head on over here to see the wonderful and varied
interpretations from the Design Team.

So I started out with some glorious pink Glitz Design paper,
specifically chosen so that I can enter this over
at Scrapbookers Anonymous for their A-Z challenge
(Letter G). I laid another sheet of Glitz paper on top,
cut down by 2cm side to side and top to bottom,
then inked it heavily and laid a mask over the top
(actually a piece of Studio Calico die-cut paper) and
at Scrapbookers Anonymous for their A-Z challenge
(Letter G). I laid another sheet of Glitz paper on top,
cut down by 2cm side to side and top to bottom,
then inked it heavily and laid a mask over the top
(actually a piece of Studio Calico die-cut paper) and
inked over that too, varying my pressure intentionally -
using inks, as you can see, has a very different effect to
using mists and the results can be even more interesting!
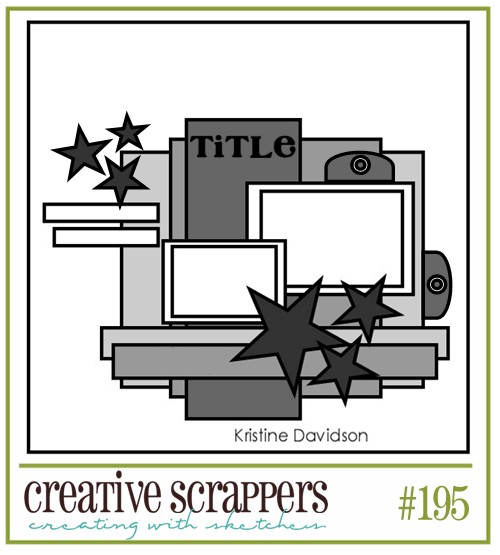 I used Sketch 195 from Creative Scrappers as my inspiration,
so I began building up my layers using co-ordinating Glitz
"Layers" and "What Nots" - to make them go further I cut
them and extended them as you can see with the grey text
card on either side of the main piece and the "Dream" text
card at the top and again on the right-hand side (both those
cards have been cut down so that I could use them in 2 places).

Instead of the stars I positioned the doilies as my
embellishments,inking as I went along (using mustard
and pink on the cards & bronze on the doilies),
then, once I had all the layers adhered together I laid
them all down on top of the papers and got everything
stuck down together & added my first photo.
embellishments,inking as I went along (using mustard
and pink on the cards & bronze on the doilies),
then, once I had all the layers adhered together I laid
them all down on top of the papers and got everything
stuck down together & added my first photo.


Next I added the Imaginarium Design chipboard
embellishment, also inked up in bronze then embossed
with clear embossing powder, added the second photo
and a couple of thin strips of paper under the photo
to ground the design, and in keeping with the sketch.

My second photo was also landscape orientation but I decided
that portrait would look better so I scored it at each side using
my awl, then folded it back on itself and adhered it underneath
so that it was raised up in the middle section, using some 3D
board underneath it at the back, for some extra dimension.

And voila! I got too excited to get finished and forgot
to take any more pictures along the way!! I doodled
around the edge, adding some bling every so often,
added my embellishments, hand-journaled and
created a long title using 5 different types of alphas.

I hand-dyed some gauze, popped on a crochet flower
hand-crocheted by my friend Irini, and sent to me all the
way from Greece (along with the doilies), added some
October Afternoon "Butterfly Garden" rub-ons (the
butterfly, etc) and some locally found metal
embellishments - the cameo and the clock.

I painted up a couple of small Imaginarium Designs Butterflies
and added in some tiny Prima roses, a bigger Prima flower
with an Imaginarium Designs oval frame (inked and embossed)
then laid over the top of it, an idea I've seen over at my
friend Nadia Cannizzo's blog recently.
friend Nadia Cannizzo's blog recently.

I inked the DISCOVER chipboard (also Imaginarium Designs
of course) with pink ink at the top and brown at the bottom,
for a dip & dye 2 tone effect before clear embossing each
letter (tip - paint the chipboard with gesso first to create
a less absorbent surface). I also glitter embossed the word
"Beautiful" with Pink Glitter Zing from American Crafts.

If you look above you can see how I folded back the photo.

I never throw away my alphas, even when I am down
to some very limited options,as I like long titles and
varying your alphas per word can be a great way
to add interest to your layouts.

all you need to do is use the word DISCOVER
anywhere on your layout/card/project, to stand a
chance to win a sponsored prize as well as a Guest
Designer position, voted for by the Design Team,
based on merit, as well as one random draw too,
so please join us if you can!

The way it works at Bird is the Word is that there is
a new word revealed once a fortnight, so there is
always a 2 week overlap of words, meaning that
the last word challenge, using the word HEART
is still open for another 10 days or so.

You can stock up on Imaginarium Designs Chipboard
here,and they will post anywhere in the world (they are
based in Australia) for actual postage costs, and it is
very light and flat so postage is not a big deal. They also
have a new Ning community where you can upload
your layouts and they have weekly featured layouts.

Supplies List for
"Discover How to Live a Beautiful Life" Layout
Border Paper - Glitz Design 'Beautiful Dreamer' Stripe
Base Paper - Glitz Design 'Beautiful Dreamer' Floral
Dot stencil - Studio Calico die-cut paper
Layers & What-Not Cards - Glitz Design - Beautiful
Dreamer and Vintage Blue
Doilies, Crochet flower,metal findings & gauze - stash
Inks - Yellow Cadmium, Lime Pastel and Candy
Pink - Color Box
Rub-ons - Butterfly Garden - Pink Paislee
Doodles - using Creative Memories Journaling Pen
Bling - Kaisercraft
Mist - Tattered Angels - Meadow Green
All chipboard embellishments and alphas -
Imaginarium Designs
Flowers & small brown alphas - Prima
Embossed pink alphas - American Crafts Thickers
"Marquise"
Embossing Powder - Clear {Ranger} Pink Glitter - Zing
- American Crafts
Brown alphas - Delish
Small pink alphas - October Afternoon 'Mini Market'
28 comments:
absolutely a beautiful page with step by step and simple instructions. You always making me going goo goo ga ga seeing your layout Helen. This is super duper beautiful and your 2 girls are gorgeous! TFS
Wow! That inking really gives it depth and richness! And those embellishments just complete this beauty of a layout Helen! :)
Gorgeous LO! I luV how u did ur chipboard! Tanx for the step by step . Luv to see how other people layer!
Stunning Helen. Thanks for the insight into your creative process. Loved watching it come to life!! :)
So gorgeous Helen.. adore all your beautiful layering & textured details!! So loving Irini's crochet flower too! Hugs :))
Wow....what a beautiful page! Love your layers. Thanks for playing along with us at Scrapbookers Anonymous!
Oh, I love it when you do these step by step posts!!! You should teach a class at your LSS!!! Thank you so much for all the tips!! This layout is just stunning!!!!
xoxoxo
Stunning stunning layout.....the depth the layers just beautiful!!
so proud that my humble fower made your magnificent layout LOl.....like I said on facebook you are an inspiration!
hugz
irini
OMG !!!! I AM SPEECHLESS !!!!! BREATHTAKING STUFF HERE HELEN ..loveeeeeeeeeeeeeeeeeeee it xoxo
You are simply AMAZING!!!! One of the most inspirational people EVER!! I loveeeeeeeeeeeeee this!! I loveeeeeeee how you shared with us how you built your lo up...loving the colors, the flowers, the photos....just EVERYTHING is GORGEOUS!! Thanks so much for playing along with Scrapbookers Anonymous!!!
Great, Gorgeous Girly LO!
(;
Eli (Scrapbookers Anonymous)
Wow, this is drop dead gorgeous, Helen! I love everything about it. Off to click on your ID link. (Thanks, Enabler!!!)
Stuning page!
Of course I will play, I think I`m addicted to BITW:)
my poor poor project....it was all planned out in my head one way until I spotted what you did with that gauze and next thing you know all that is out the window (door?) and I'm planning it a different way!! one of your inspirations (or two) I used on a page that goes live tomorrow...thanks as always for your lovely work, sharing it with us, and for your fresh and new ideas...
Wow! This absolutely beautifull!
I love it so much when you show us how you create your LO step by step.
You are simply AMAZING HELEN!!![[feels like hugging u]]!!!! I just love everything you created... You made it look so simple to create this beautiful and stunning layout!!! YOur projects and work are absolutely one of the most inspirational EVER!! I'm loving the colors, the flowers, the photos....just love this in every possible ways..Thanks so much for playing along with US over at Scrapbookers Anonymous... hugs...xoxo
beautiful layout.. so much detail and i love that glitz paper you used. Thanks so much for playing along with us this month at Scrapbookers Anonymous. =)
WOW Helen! What a STUNNING layout! Lovin' all the beautiful embellishments and sweet photos! TFS
Absolutely stunning layout Helen, so many gorgeous details and I love the dimensional design with all that layering.
Helen THANKS THANKS THANKS for the step by step showing of how this stunning page was created. You help us all learn and improve! Not many people do this. Thank you!
Hi dear!
This is So Beautiful!!! love these sweet pictures and all the layering.
Oh girl, you made a class here,TFS!
Beautiful work!!
Hugs! :)
WOW! Helen, you never fail to create just beautiful works of art!! This one is NO exception- gorgeous layering, love all the details and your step-by-steps.
I've been wanting to thank-you as well for the Liebster award. Kelly & I have actually received this 3 times and are working on an appropriate post to recognize the kindness of those who nominated us for it! You're very sweet, thank you :)
Take care!
Wow! This is just fabulous, fabulous, fabulous!
Be still my heart! There is so much that I love on this page...Glitz papers, pressed ink, doilies, crocheted flowers, doodling, two-tone inking, OA rub-ons, folding, rhinestones, handwritten journaling...it's like you took all my fave things and put them together on one LO. :)
What an absolutely stunning layout Helen! You are so talented girl! xx
Helen sorry this is late. I am amazed at this LO. Each step I saw I thought that's beautiful, then again at the next, the final page was just so stunning. Such a lot of inspiration here. Thank you so much for the step by step.
You are the BEST Helen! love your easy to follow and no mucking about tuts! and your page - wow! I say wow! and did I say wow? YEAH!! xoxox
Post a Comment